Where to begin in Flash
This document contains information to introduce new CIMEL developers to the necessary information that they will need to get started.
Basically, all development is done using Macromedia Flash MX and starts with the newMovieExemplar.fla file, which is available in either the "Flash Exemplars and Templates" or "Flash Movies - Development Libraries" directories on the server.
Each of your movies should begin with either the newMovieExemplar or any other previously-created movie (feel free to start with another movie that's similiar to one that you've already created to reduce the amount of work you need to do). The important thing is that the CIMEL ActionScript functions in the movie are current (that is, they should match the script in the latest version of the newMovieExemplar). To gain an understanding of what the script is for, and how the movies ought to be laid out, read on:
newMovieExemplar.fla
The contents of the stage of the newMovieExemplar are simple. There are only three elements: a template of colored boxes which denote the various divisions of the Cimel interface, a textbox, and the Professor persona.
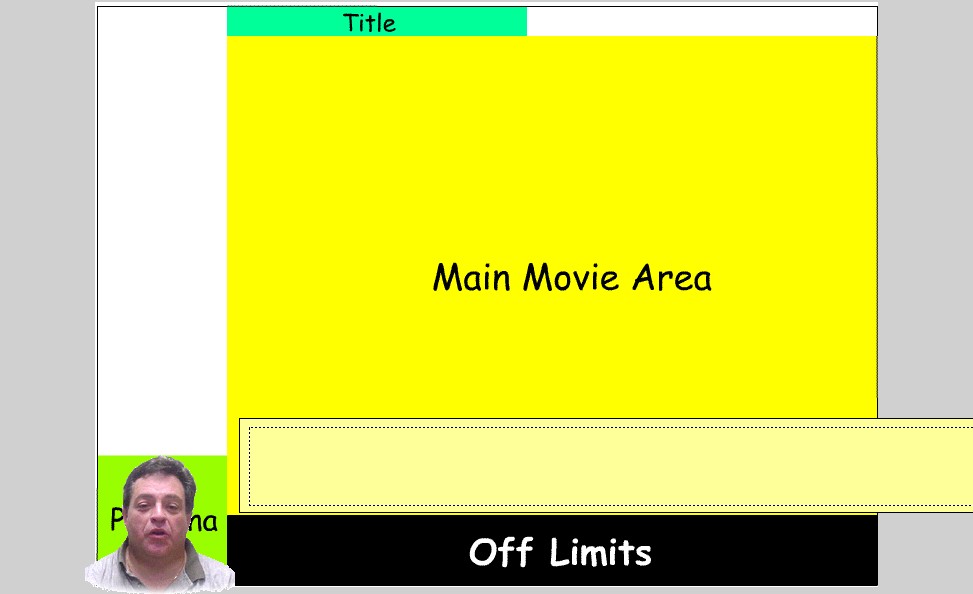
The divisions of the content window are simple:
- The Main Movie area is where all of the content is typically displayed.
- The Title area is small space on the top of the screen which the developer should leave empty. The CIMEL interface will automatically fill in the movie's title when it is loaded in the browser.
- The Persona area in the lower left corner is the personae "home" position. Although the personae may occasionally move out of the corner under certain conditions (to administer an interactive quiz or to point out important content on the screen), for the majority of the time, the image of the primary speaker will remain in this area.
Note: If more than one persona is used in a given screen, you have two options--either remove the first persona and place the second one in the same position, or place the second persona elsewhere on the screen, preferably towards the bottom.
- The "off-limits" along the bottom is where the user interface buttons have been placed. They should never be covered up with content (with the exception of the textbox, which may be placed over the buttons if there is no way you can fit it in the main movie area).
- The white space on the left side of the space is reserved for the track list, and is also off-limits for any content.
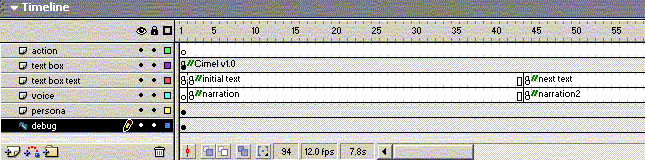
The timeline of the newMovieExemplar is also straightforward.
Here is the breakdown by layer:
- The action layer should be used to store movie frame actions, especially movie timeline control scripting (e.g. store all jumps and labels on this top layer so that they're easily understandable).
Note: The last frame of the actions layer should contain a keyframe with the following ActionScript:
stop();
_root.EndOfMovie();
These two instructions stop the playback of the movie, and return control to the main user interface.
- The text box contains the textbox movie clip and the first frame of the text box layer contains all of the textbox-related ActionScript. There isn't much on this layer that you can change, except for the default location of the textbox. Simply drag the textbox to any location that you want it to initially appear on the stage.
Notes: Do not break up the textbox keyframe into multiple keyframes. Make sure that the single instance of the textbox exists from the first frame until the final frame of the movie. Also, make sure that the textbox has the instance name 'textbox', to ensure its correct operation.
- The text box text layer should be used to control the text which is displayed in the textbox. The relevant functions are documented in CIMEL Movie Functions.
Note: Do not attempt to display text in the first frame of the movie. showText commands should not be used until the second frame to ensure proper instantiation of the textbox variables.
- The voice layer should be used to write the script for the actions which control the voice-over playback. This code is also documented in CIMEL Movie Functions.
- The persona layer should be used for the main persona image.
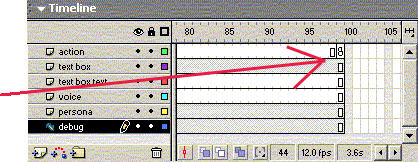
- The debug layer is simply a guide which stores the image of the different work areas of the stage described above. (Guides are not included in the published file.)
 Publishing info:
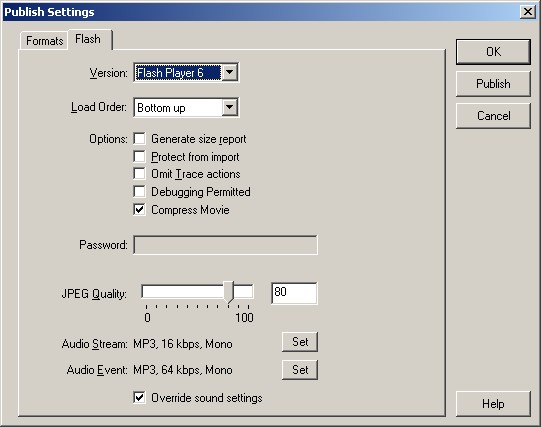
- All movies must be published with the "Flash Player 6" version. (If an older version is used, the dynamically-loading sounds will not work correctly).
- The final version of your movie which is uploaded to the server should be published with the "Compress Movie" option checked. (Don't bother checking this box until you're completely finished).
Documented by: dasc 1/03
Return to Main Development Page