Google Form Hacks
Welcome
Hello, and welcome. In this tutorial, we will look at some cool tricks we can do with Google Forms. In truth, this is as much about spreadsheets, JSON, and jQuery as it is about Google forms.
Step 1 : Set Up A Google Form
The first step, of course, is to set up a Google form. For this tutorial, I'm going to do a very simple form. We're going to ask the person filling out the form to choose a favorite style of cuisine. Then, based on their response, we'll limit the options they are allowed to choose from a second pulldown. We'll simultaneously have limits on how many people can choose each option.
Note that our "limits" are going to be flawed. They'll work most of the time, but if you think carefully about your code, you'll be able to describe a case in which the limit can be exceeded.
First, set up a Google form. You can do this by going to Google Drive, clicking "New", and picking "Google Forms". The "Google Forms" option might be hidden under the "More" sub-menu.
Don't worry too much about making your form beautiful. We are going to rip apart the HTML in the end. But make sure you fill in each list option very carefully. The text you choose will matter a lot.
With all of that said, our form will have four fields. The first is for specifying a name. The second is for choosing a preferred type of cuisine (either Italian or Southwestern). The third is for choosing a specific food. The fourth will be a radio for indicating if the person filling out the form is happy with their choice. Note: don't make any of your fields "required", and don't have any validation on the content. We'll handle that in our own JavaScript.
For reference, here are a few screenshots from when I set up the form.


Step 2 : Adding A Summary To The Form's Linked Spreadsheet
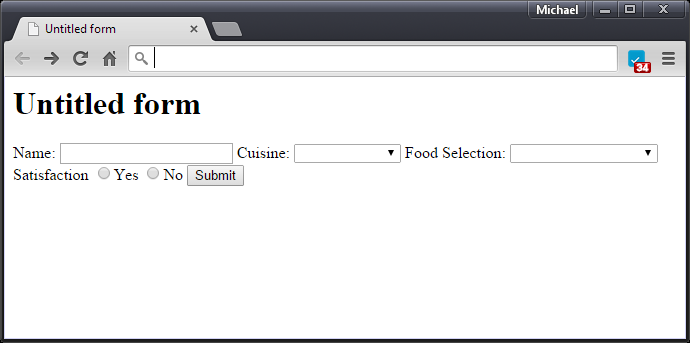
From the Google Forms page, you can click on the "View" menu option, and then choose "Live Form". You should see something like this:

Go ahead and fill out your form a few times. Make sure you choose every option. We're ultimately going to clobber all of the data you put in, but it's helpful while we're getting started. Here's my data, for reference:

Now it's time to start making the cool stuff happen. We're going to add a second worksheet to our spreadsheet. You do this by clicking the "+" in the bottom left corner. Rename your sheet to "Summary", and then in the first row, set the column values to "Title", "Constraint", "Limit", and "Current".
Using copy-and-paste, get the exact text that is in the first page for each of your four meal options, and paste those values into the first column. Then do the same in column 2, noting that this time, you'll have duplicate values. We're going to say only 5 people can choose each meal, so let's put "5" in each row of the third column. Your spreadsheet should look like this:
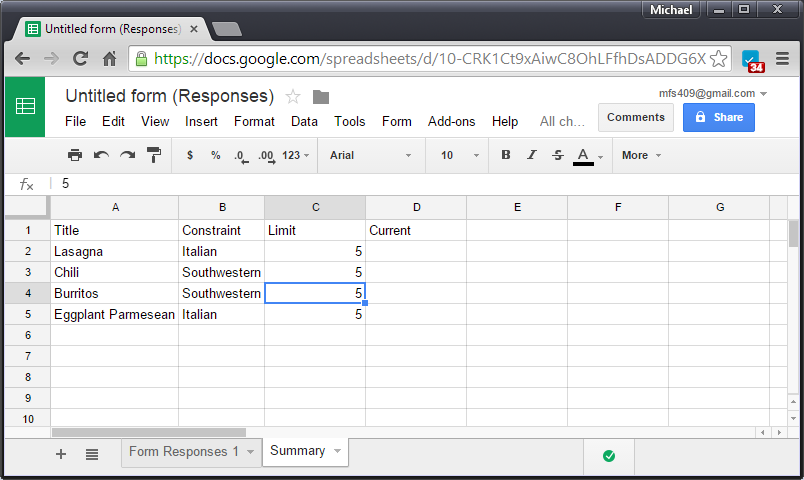
Lastly, we need to indicate that the fourth column should count how many sign-ups we have. We're going to cheat here, and assume no more than 100 people will sign up. If that's the case, then we need to make a formula that counts the number of entries in the "Form Responses 1" worksheet that have a specific value in Column D. Since we have the specific values in Column A of this worksheet, we can use a formula such as:
=countif('Form Responses 1'!D2:D102, A3)Let's do that for all four rows, taking care to change only the cell index of the value to compare against (e.g., A1, A2, A3, A4). As you can see in the following screenshot, we now are properly counting the frequency of each selection within the form responses.

Step 3 : Cloning And Pruning The HTML
A great thing about Google Forms is that Google doesn't care how a form is submitted, as long as the content is compatible with the form document you created. What this means to us is that we can copy the HTML of the Google Form webpage, strip it clean, and then write an interactive, jQuery-based interface over it.
Take a look at your form's HTML code, by viewing the live form, and then asking your browser to show the HTML source. It's gross. I'm not even going to show mine here, because it's just that gross. Really.
The good news is that all we need to do is get rid of everything other than the stuff related to our form. For this specific example, that means we just need to preserve the <form>, <input>, <select>, <option>, and <textarea> tags.
What you will want to do is save the HTML source for your Google Form onto your hard drive. Then open it in an editor and start hacking it up. As you make changes, test your form by opening the local HTML file in your browser and trying to populate the form and submit it. You should be able to do this even after removing all of the non-form-related tags. You might want to use version control here to keep copies of the form as you move along. You can also clean up some of the attributes (but never 'id' or 'name'). Here's my form's HTML, after I pruned it to just about a bare minimum web page:
It doesn't look pretty:
But it still works. Please note that the 'id' and 'name' fields in your form will be different, as will your form's 'action'.
Step 4 : Introducing JSON
JSON, the JavaScript Object Notation, is a way of representing data. What distinguishes it from other text-based representations (e.g., XML) is that it is both (a) a totally declarative representation, and (b) pure JavaScript that requires no special parsing to be used. Let's look at a quick example. Below is a capture of me declaring some variables using JSON format, in the node interpreter.
In your browser's developer tools, there is a JavaScript console. It allows you to inspect any variable. There are a few ways to do it. You could type the code in the above capture direclty in the console. You could also use console.log() to print a JSON object, in which case the console will give you a nice way to explore the object.
Step 5 : Publishing your Summary Spreadsheet
This is where things get really cool. In Google Spreadsheets, we can "publish" just the second page of our spreadsheet. That's a really imporant point. We don't want to publish the first page, because it could have sensitive data. But the second page is completely on-limits. Once we've published it, we can find the JSON feed for that page, and we can use jQuery to fetch that feed.
Let's start by publishing the feed. Go to your spreadsheet, choose the Summary page, and go to "File"/"Publish to the web". In the dialog box that appears, choose the "Link" option, and then choose just the "Summary" page. Then click "Publish". You should see something like this:
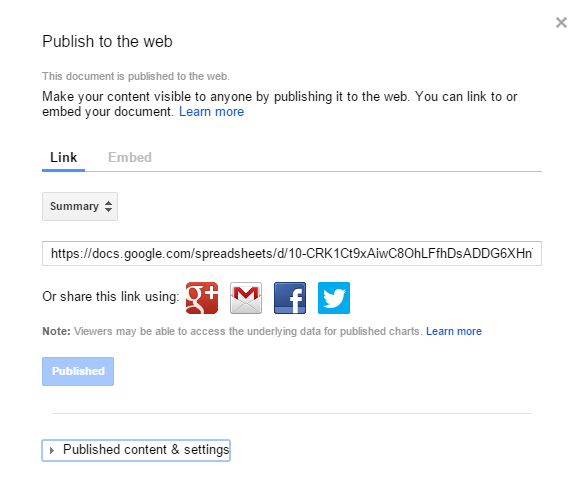
The seemingly random text that appears in the box of the form is extremely important. Every page will produce a different value, but that value is the key by which we can refer to this document when talking to Google services.
There is a second key that we also require. I'm going to refer to it as the "token". And I'm going to confess that I don't fully understand how all of this works, but the method I describe below seems to do what we need it to do.
We need to have both the key and the token. We know the key. Using just the key, we can get a list of all the feeds that exist for a spreadsheet. Most of these feeds are private (that is, you can't access them without being logged into Google Docs as an account with appropriate permissions. However, we can figure out the key/token pair that we need in order to access the spreadsheet.
The trick is to replace "KEY" with your key in the following url:
https://spreadsheets.google.com/feeds/worksheets/KEY/private/full
Visiting this link will give you a rather inscrutable bit of XML
code. The key nugget we're going to extract from it is the last
<link> tag. In mine, the link says:
See that part right after the word "full", which in my case is "od0ha5s"?
That's the token. Now you can construct the path to your JSON feed.
It's going to be this:
https://spreadsheets.google.com/feeds/list/KEY/TOKEN/public/basic?alt=json
In my case, the path is https://spreadsheets.google.com/feeds/list/10-CRK1Ct9xAiwC8OhLFfhDsADDG6XHnYW-pT1rYtaAY/od0ha5s/public/basic?alt=json
If you click on the link above, you'll get a web page with some pretty inscrutible-looking JSON on it. But look closely, and you'll see that there are words like "Eggplant Parmesean" in there. It's our data!
Let's do a quick security check: open an in-cognito browser window (or private mode, or whatever your browser calls the mode where your identity is not given to web sites). If you construct your path using the KEY and TOKEN you found, it should still work, even from an anonymous browser session.
For the rest of this tutorial, my code examples are going to use my key and token. You should be sure to use your key and token.
Step 6 : Using AJAX to Fetch JSON
Remember that simple HTML page we made before? Open it up, and then dump the following code into it:
That code is going to change, but it lets us look at the JSON object in a slightly more structured way: in the browser's JavaScript console. Let's explore the data:

From this, we can see that the object's feed field has an array called entry. Each element of the entry array has an object with two useful fields: content and title. Each of these has a field called $t with the data we need, in text form. We're going to need to massage this data a little bit to get it into a useful state (the replace, split, and parseInt functions are going to be useful), but we can do everything we need from here.
Step 7 : A Little Bit Of jQuery
It's an understatement to say that jQuery is a populare JavaScript library. Normally, it's a bad thing to say that a library does more than one thing, but in jQuery's case, we'll forgive the over-reach. jQuery makes it easier to:
- Navigate the DOM
- Handle events (e.g., mouse, keyboard)
- Perform CSS-based animation
- Issue AJAX requests
In this section, we're going to focus on navigating the DOM. When your browser loads a web page, it creates a "Document Object Model", or DOM. You can think of this as being a tree that stores all of the elements in your web page. You can look at the tree structure of the DOM from the Chrome Developer Tools (press F12). This was, of course, how we reached the JavaScript console. But take a look at the "Elements" tab:

Pretty cool, huh? With jQuery, we can select specific elements from this tree. If you look at the "codetutorial.js" file that is used by this web page, you'll see some examples of selecting elements. They tend to look like this:
Step 8 : Making Our Form Multi-Part With jQuery
Once we've used jQuery to select a specific element, we can do all the normal sorts of JavaScript things to it. So in our case, let's take that form from before, and let's make it into a multi-part form with some rudimentary validation. Let's also make sure that every option in each select has an "id" tag, since we'll need it later...
Remember: the name and id attributes in your form should not be the same as in mine, and the form's action should be different, too. Otherwise, this form won't send data to your spreadsheet, it will send the data to mine.
Step 9 : A Quick Note On Spreadsheet Cleanup
If you're like me, you probably put a ton of garbage into your spreadsheet while you were testing out your form. If you want to reset your form, you should take the following three steps, in order:
- Open your form in Google Drive, select the "Responses" menu option, and choose "Delete all responses"
- Open your spreadsheet in Google Drive, highlight the entire rows that have data in them, right click, and choose "Delete rows"
- Switch to the Summary tab, and fix the countif formulas so that the range begins at D2
That's it... now you should see that new entries start in the first non-header row.
Step 10 : Parsing Your JSON
Before we get to the part that you should do on your own, let's briefly discuss how to parse the JSON data.
Recall that we can look at the JSON in the Console. That makes it a lot easier to figure out how to use it. Go ahead and use code like the following to look at your JSON:
We can see that the title is separate from the content, that the total number of rows is stored in another place in the JSON, and that all of the content is in a big string, instead of being in an array. We can work with that. Here's a bit of code to show how to massage the data into an array-of-strings format and into an array-of-objects format.
Step 11 : Next Steps
To make sure you understand everything we've covered in this tutorial, you should try to do the following projects:
- Use the remove() function on specific option tags, so that the choices in the second part of the multipart form are controlled by the choice made in the first part.
- Use the data retrieved from Google Spreadsheets to remove option tags corresponding to food choices that are at their maxiumn value.
- Come up with a cleaner way to handle form submission, so that it doesn't lead the user to a Google page. You might want to make the target of the form a hidden IFRAME.
- Improve the validation mechanism. Try to find good regular expressions for checking if names, phone numbers, and emails are properly formatted.
- Display a "loading" message instead of the first part of the form, and don't allow the user to fill in anything until the JSON object is retrieved.
- Add a second JSON query immediately before form submission, to prevent violations of the "limit" column (bullet 2) when several people load the page when the limit is almost reached.
That last part is very important... for as neat as it is to extend Google Forms like this, since we're working entirely on the client side, we cannot actually guarantee that the limits aren't exceeded. For some workloads, the small window of vulnerability is acceptable. But for others, we'll need to use server-side techniques.